Capturing screenshots is an essential feature for both work and personal use. Whether you want to save a funny meme, document a software issue, or create a tutorial, it is good to know how to screenshot with Windows 10 computers.
Windows 10 offers several methods to take screenshots quickly and efficiently. In this guide, we’ll walk you through the different ways to screenshot on Windows 10, from built-in tools to keyboard shortcuts.
How to Take a Screenshot on Windows 10
Let’s get to the point now that you know why screenshots are useful. Here are some of the common ways you can capture your screen:
Snipping Tool
The Snipping Tool is a built-in application on your Windows 10 PC. It allows you to take screenshots of specific areas on your screen.
To use your snipping tool:
- Open the Snipping Tool application and click New.
- Choose the type of snip you want. It could be Free-form, Rectangular, Window, or Full-screen.
- Now drag your cursor over the area you wish to capture.
- The image captured will appear in the Snipping Tool editor as a new window.
- You can edit the image or save it after adding annotations or highlights.
Where can you use this method? Students can access images taken by this tool in their educational materials. It will help the publishers illustrate complex topics, helping students grasp concepts more easily.
When seeking technical assistance, screenshots help users provide a clear view of the issue. This enables support teams to offer more accurate solutions.
Snip & Sketch
Windows 10 introduced Snip & Sketch, a successor to the Snipping Tool, providing more functionalities and an improved interface:
- Press Windows key + Shift + S to open the Snip & Sketch tool.
- You will find the area you captured on your clipboard after selection.
- Open the Snip & Sketch app from your Start menu.
- Click on the “New” button to create a new snip.
- The captured screenshot will appear in the editor.
- Here, you can add annotations, highlight sections, and save it.
This method is simple and effective. It is used by developers to track changes, visualize bugs, and demonstrate issues that need attention. Support teams rely on screenshots shared by users to diagnose problems. With specific sections highlighted, they can guide users through solutions.
Print Screen (PrtScn)

The Print Screen key is a familiar method to take a screenshot of your entire screen or the active window:
- Press the PrtScn (Print Screen) key on your keyboard. This captures your entire screen.
- To capture the active window only, press Alt + PrtScn.
- Open an image editor (e.g., Paint, Paint 3D) and paste the captured screenshot (Ctrl + V).
- Edit and save the screenshot as needed.
Since this is a quick method, it is used mainly by web developers to share screenshots with clients and team members. It takes just a minute and a minimum knowledge of Windows tools to showcase website designs and gather feedback.
Writers, editors, and designers also use screenshots to share drafts and layout ideas, enabling collaborative editing and refinement. The print screen feature takes just a moment for project managers to document progress, highlight milestones, and communicate updates to stakeholders.
Windows + Shift + S: Grabbing Snippets
Windows 10 offers a quick shortcut to capture snippets of your screen:
- Press Windows key + Shift + S.
- You will notice your screen turning dim as a snippet toolbar appears.
- You can now select the portion of your screen you need to trim.
- It will be copied to your clipboard.
- Paste it in your image editor or a document.
Xbox Game Bar: Capture Gaming Moments
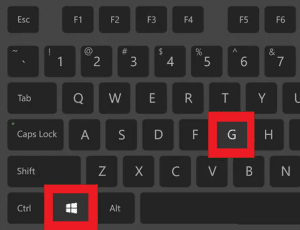
If you’re into gaming, the Xbox Game Bar provides a way to capture screenshots on Windows 10 while playing:
- Press Windows key + G to open the Xbox Game Bar.
- Click on the camera icon or press Win + Alt + PrtScn to take a screenshot.
- The screenshot will be saved in the Captures folder in your Videos library.
Third-Party Applications
Now you know how to screenshot with Windows 10, but the solutions don’t end there! In addition to these ways, Windows 10 has unlimited access to the Microsoft Store. Here, you can capture screenshots using third-party applications that you can download.
You will have a wide variety of options to look through and choose an app that works with your PC. You can work more efficiently and edit your photos if you have more possibilities. By personalizing your experience, you can even download this new software to your PC and easily access it by adding it to your desktop.
Benefits of Taking Screenshots
Grabbing a shot of your screen might seem like a basic feature. Remember back in school when we used to capture conversations to keep the rumor mill working? But when you get into the corporate world or even as a casual user, this is a valuable tool with a wide range of benefits and applications.
From enhancing communication to aiding troubleshooting, here are some ways screenshots can be advantageous:
Enhancing Communication
Screenshots provide a visual medium for conveying complex ideas, concepts, and information. They bridge the gap between text and visuals, making communication more effective and engaging.
When explaining a process or concept, a screenshot can capture the steps or elements involved. This is especially useful in tutorials, manuals, and presentations. Screenshots also add visual appeal to written content, breaking up text and making it easier for readers to follow along.
Visual cues can make the content more memorable and digestible. Imagine taking a screen capture on Windows 10 to present reports to your clients. It acts as data your client can rely on as screenshots leave little room for misinterpretation.
Instead of relying solely on descriptions, you can show exactly what you mean. You won’t believe how much this can reduce the likelihood of misunderstandings.
Documentation and Troubleshooting
Screenshots serve as invaluable documentation tools, helping users capture evidence, errors, and problems that occur on their devices. This documentation can be crucial for troubleshooting and issue resolution.
They are often attached to bug reports, providing developers with a visual representation of the issue. This aids in identifying the cause and formulating fixes. Even during software testing, screenshots document the different stages and outcomes of testing scenarios. This ensures thorough testing coverage.
It is also worth noting that screenshots can serve as a historical record. They can preserve a visual snapshot of how a webpage, application, or document looked at a specific point in time.
Collaborative Work and Feedback
Windows 10 screenshots foster collaboration by allowing team members to share visuals. They can also share their ideas, gather feedback, and work together more efficiently.
Screenshots serve as visual references when discussing design changes, layout suggestions, or new features. In remote work settings, they bridge geographical gaps by providing team members with a visual context. It is also interesting to note how a quick screenshot can act as a collaborative tool for feedback on designs, documents, and projects.
FAQs
How do I take a screenshot on Windows 10?
You have many ways to take screenshots on your Windows 10 OS. You can use the Snip and Sketch tool, which is the easiest method. You just have to hit Windows + Shift + S and select the area of your screen you wish to capture. This will give you the screenshot on your clipboard which you can paste or edit.
Where are my screenshots saved?
Screenshots are mostly available on your clipboard to be pasted into a document or to be saved as files. In some cases, you can find the screenshots in snippet tool apps or image editing apps you use.
Are there keyboard shortcuts for screenshots?
Yes, you can use these keyboard shortcuts on your Windows 10 PC – Windows key + Shift + S to open the snipping toolbar for capturing a screenshot. Then the Windows key + PrtScn to capture the entire screen. You just have to then save it as a file on your PC after editing.
Can I capture specific parts of the screen?
Yes, you can pick out certain areas of your screen using the Snip and Sketch tool. You can choose the necessary portions of your screen in full-screen, free-form, or rectangle modes by using the Snip and Sketch option. On the other hand, using the print screen option would require you to capture the entire screen and then crop out the necessary area.
Are there built-in screenshot editing tools?
Yes, the Snip and Sketch tool is more than enough if you wish to edit your captured screenshots. You can use the basic editing features to annotate or highlight the images and even crop them as per your needs.
Conclusion
Windows 10 screenshot features are great for various users. You can use this feature whether you are a student or a working professional. Even casual users can use the tool to capture their screens and share troubleshooting queries.
You now know how to screenshot with Windows 10 using almost six different methods. You also know how to edit your images and save them for future use or sharing. So, set forth and grab screenshots of your screen!
- Betify Casino: Guide Détaillé 201 - December 26, 2025
- Analyse Complète de Betify Casino – Revue 98 - December 26, 2025
- Notre Avis sur Betify Casino – Partie 12 - December 26, 2025


